Radiant Barrier Upgrade in Bell Canyon, CA
Serving Ventura & Sacramento Counties
Radiant Barrier Upgrade Bell Canyon, CA
Bell Canyon, CA homes face intense sun exposure, steep temperature swings, and canyon microclimates that drive high attic heat gains in summer. A targeted Radiant Barrier Upgrade in Bell Canyon, CA focuses on restoring or improving the reflective layer in your attic so it actually reduces roof-to-attic radiant heat. At the decision stage, homeowners want to know: is an upgrade necessary, what will it involve, and how much cooler and more efficient will my home become? This page explains the assessment, recommended upgrade options, installation process, and realistic performance improvements you can expect.
Why upgrade an existing radiant barrier in Bell Canyon, CA
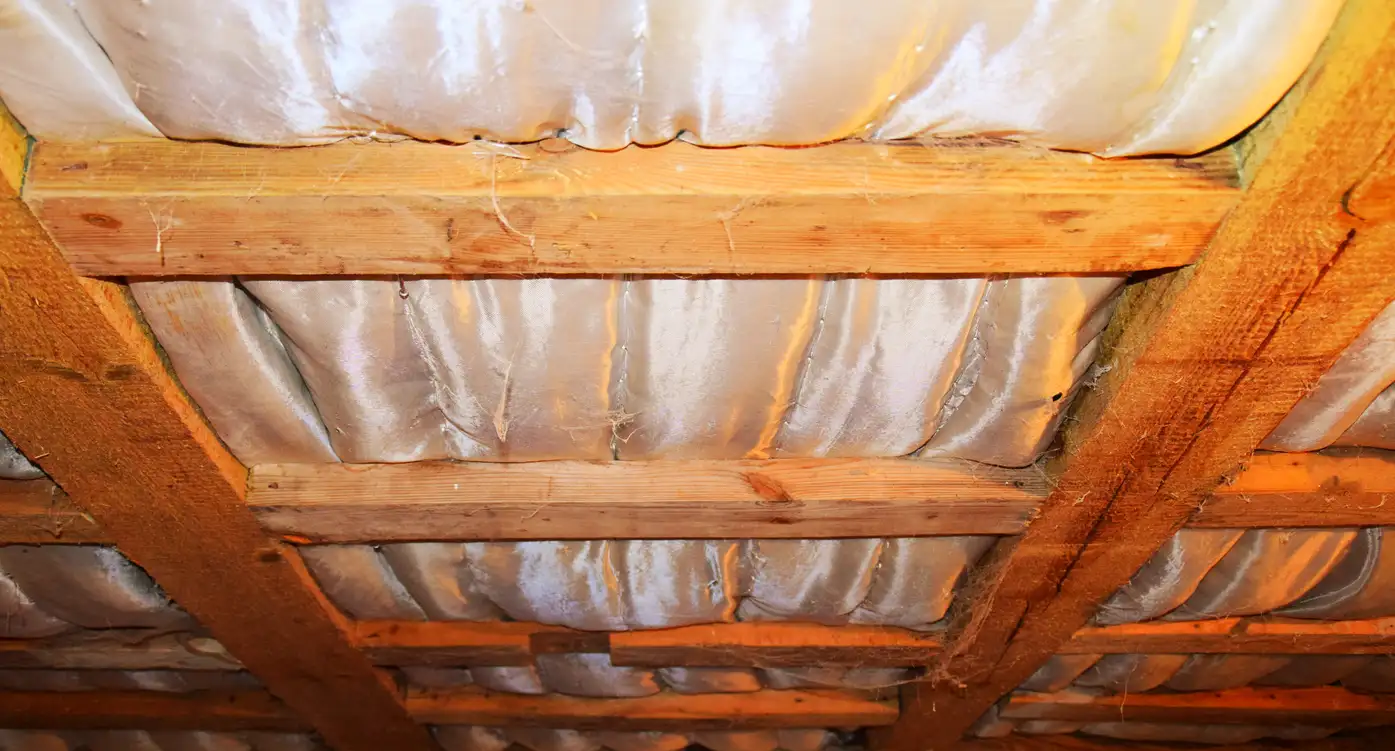
Over time a radiant barrier can lose effectiveness from dust, tears, moisture, or improper original installation. In Bell Canyon, CA, strong sun angles and limited shading mean the attic surface can reach very high temperatures, so a compromised radiant barrier becomes a missed opportunity to cut cooling load. Common signs that an upgrade is worthwhile:
- Attic temperatures remain extremely high on hot days despite having a radiant barrier
- Barrier is torn, sagging, or has large sections missing
- Heavy dust accumulation on the reflective surface (dust lowers reflectivity)
- Roof or attic retrofits (solar panels, new roof sheathing) that disturbed the original barrier
- Unchanged cooling costs or long AC runtimes after initial installation

Common radiant barrier issues in Bell Canyon, CA
- Dust and dirt on the reflective surface, especially near roof vents and ridge areas
- Tears, rodent damage, or sagging due to poor fastening
- Incorrect placement with no air gap (reduces effectiveness)
- Use of low-reflectance or aged foil products that have lower emissivity
- Lack of integration with insulation and attic ventilation, producing suboptimal results
Assessment: what a professional upgrade inspection includes
A proper upgrade starts with a focused attic audit to measure how the current system performs in Bell Canyon, CA conditions:
- Visual inspection of the barrier condition and attachment method
- Thermal spot checks of attic surfaces and temperature profiles (roof decking, rafters, attic floor)
- Measure attic ventilation effectiveness and check for blocked soffits or missing baffles
- Inspect insulation R-value and identify air leakage pathways (top plates, recessed lighting, duct penetrations)
- Evaluate moisture or pest damage that may require repairs before retrofit
This assessment identifies whether cleaning, partial replacement, or full replacement will deliver the best value.
Recommended improvements and replacement materials
Upgrades are tailored based on the assessment. Typical upgrade strategies include:
- Clean and re-seal: If the foil is dusty but intact, professional cleaning and re-taping seams can restore reflectivity.
- Add a new reflective layer: Install a high-performance foil-faced radiant barrier over or under the existing material. Options:
- Foil-faced kraft paper (floor/ceiling applications)
- Perforated or non-perforated aluminized foil for roof-deck installations
- Multi-layer reflective insulation (foil-bubble-foil) where added R-value and radiant reflection are needed
- Replace damaged sections: Replace torn or rodent-damaged sheets and resecure seams with HVAC-grade foil tape
- Combine with insulation top-off: Adding blown-in or batts to the attic floor while upgrading the barrier amplifies benefits
- Improve ventilation and baffle installation to maintain the required air gap for radiant barrier effectiveness
Material choice depends on attic configuration. For Bell Canyon, CA roofs with high solar loads, aluminized foil installed on the underside of roof sheathing or stapled to rafters with a continuous air gap offers the best radiant heat rejection.
Installation process for radiant barrier upgrades
A professional upgrade follows a methodical process to protect home components and maximize results:
- Preparation: Clear work areas, protect HVAC/electrical components, and set up safe access.
- Repair and air sealing: Fix roof penetrations, damaged decking, and seal major attic air leaks that undermine thermal performance.
- Ventilation check: Install baffles or restore soffit/ridge ventilation where needed so the radiant barrier has the necessary air gap.
- Install or replace barrier: Staple or fasten the new foil to rafters or roof deck per manufacturer specs. Maintain continuous seams and overlap; seal with foil tape.
- Integrate insulation: Add or redistribute attic floor insulation if the audit called for top-off to reach target R-values.
- Final testing: Re-check temperature differentials, verify vents are clear, and inspect barrier seams and fastenings.
Upgrades are planned to minimize disturbance to existing insulation and ducts; installers should leave the attic clean and all vents functioning.
Anticipated improvements in attic temperatures and cooling costs
Performance varies by home configuration, climate, and how well the barrier is integrated with insulation and ventilation. In Southern California microclimates like Bell Canyon, CA you can reasonably expect:
- Attic temperature reductions: typical drops of 10 to 30 degrees Fahrenheit on hot afternoons when a degraded barrier is properly upgraded and air gaps are restored
- Cooling cost improvements: 5 to 15 percent reductions in summer cooling energy are commonly reported when a high-quality radiant barrier is part of a combined attic upgrade (radiant barrier + adequate insulation + air sealing)
- Reduced AC runtime and improved upstairs comfort: less heat transfer into living spaces leads to shorter compressor cycles and more consistent indoor temperatures
- Indirect benefits: lower peak loads on HVAC equipment, potentially prolonging equipment life and delaying replacement
Actual savings depend on roof orientation, attic ventilation, insulation levels, and household thermostat behavior. Homes with dark roofing, limited shade, or high attic solar exposure will see the greater end of these ranges.
Maintenance and long-term considerations
- Inspect the attic and barrier every 3 to 5 years for tears, dust, or animal damage.
- Avoid storing items directly on top of a radiant barrier when it’s installed on the attic floor; compression and dust reduce performance.
- Combine barrier upgrades with air sealing and insulation top-offs for best payback.
- For homes planning roof work or solar installations, coordinate radiant barrier upgrades at the same time to avoid rework.
Making the decision: replace or upgrade?
Choose cleaning and spot repair when the barrier is largely intact and installation access is easy. Opt for full replacement or adding a high-performance foil layer when the barrier is heavily damaged, permanently dusty, or was installed without the recommended air gap. In Bell Canyon, CA’s sun-intense environment, a professionally designed upgrade that pairs a reflective barrier with proper ventilation and insulation usually offers the most durable comfort and efficiency improvements.
A well-executed radiant barrier upgrade in Bell Canyon, CA reduces attic temperatures, lowers summer cooling loads, and works best when it is part of a comprehensive attic performance strategy: correct installation, sealed attic, and sufficient insulation.
Energy Smart Upgrade: Radiant Barrier Upgrade in Bell Canyon, CA
Already have a radiant barrier? Improve it with upgraded materials from AirWorks Heating Air Plumbing. We offer reflective barrier enhancements that work with your current insulation system. Book a consultation now, and learn more about us or check exclusive discounts.
Reflect More, Save More—Upgrade Your Radiant Barrier
More HVAC & PlumbingPlumbing Tips & Articles
.jpg) Ventilation& Air Purifiersdiscover more about it
Ventilation& Air Purifiersdiscover more about it- Ventilation& Air Purifiersdiscover more about it
- Ventilation& Air Purifiersdiscover more about it

Financing for Your AC, Heating, or Plumbing needs, Big or Small!
Hear What Our Satisfied Clients Have To Say